Sunday, October 6, 2013
Classic Craft Week!
These are crafts that you've probably done in the past, but have forgotten how to do! I've done some of these 50 times over and they still ask "again! again!" Enjoy!
Friday, April 13, 2012
Make A Sweet Necklace!
This is a very easy craft to do and is sooo delectable too.
What you'll need:

What you'll need:
- licorice whips
- Fruit Loops and/or frosted Cheerios ( regular Cheerios aren't as good...)
- Use long pieces of licorice whip for a necklace and short ones for a bracelet.
- String the cereal onto your licorice whip piece but leave some room on the ends
- Tie the 2 ends together of the extra space you have at the ends
Weekend Mix Match Time!
This Weekend mix match is fun treats 2 eat! Of coarse you need the parents permission to feed them period or give them candy so ask first!

Weekend mix matches!
From now on I'm am starting something called weekend mix matches! I have a theme for the whole weekend and post games, crafts, advice, or ideas that go with it. Only on weekends and the theme changes every time!
Saturday, March 3, 2012
Babysitter Name
Kids think babysitters with awesome names are, well... awesome! This sounds really lame but the kids think its hilarious!
Your Pets Name. (if you do not have a pet use what you think your pets name would be if you did have one. Mittens, Whiskers, Buddy, Etc.)
You favorite food.
Your favorite restaurant.
Combine these to make you cool babysitting name. Mine came out: CallieCat Taco Chic-fil-a
Your Pets Name. (if you do not have a pet use what you think your pets name would be if you did have one. Mittens, Whiskers, Buddy, Etc.)
You favorite food.
Your favorite restaurant.
Combine these to make you cool babysitting name. Mine came out: CallieCat Taco Chic-fil-a
Wednesday, February 22, 2012
Crafts: Paper Bag Animals
These handmade toys and games are meant for little hands to enjoy -- but children can lend a hand with the construction, too.
Kids don't need to pull any strings to find puppets eager to put on a show. In fact, they can make the chatty creatures themselves with paper.
How To:
Achieving the end result -- the troupe of adorable animals here -- is simple; the real challenge lies in perfecting just the right lion, dog, and pig voices.
Lion Puppet How-To1. Cut the mane from construction paper.
2. Slip bag's bottom into mane's opening to create face. Cut ears and arms from another bag; inner ears, eyes, nose, teeth, and claws from construction paper.
3. Attach arms to front half of side pleats, ears and teeth under face
Tip: Glue tiny details, such as claws, onto larger pieces before you assemble your new puppet.


Dog Puppet How-To1. Fold under lower corners of bag's flattened bottom and glue.
2. Cut blaze and belly from white construction paper, ears and tail from brown, eyes and nose from black, and tongue from pink.
3. Glue everything in place, securing tongue under face and tail to the back of bag.

Pig Puppet How-To1. Glue pink construction paper to bottom of a pink bag to hide creases.
2. Cut ears and snout from decorative paper in a rosy shade; glue in place. Add tiny construction-paper eyes and nostrils.
3. Cut arms from pink construction paper; glue to front half of the bag's side pleats.

Kids don't need to pull any strings to find puppets eager to put on a show. In fact, they can make the chatty creatures themselves with paper.
How To:

Martha Stewart Kids
Kids don't need to pull any strings to find puppets eager to put
on a show. In fact, they can make the chatty creatures themselves. All a
young puppeteer needs is a few paper bags, some scraps of colored
paper, and a lazy afternoon.Achieving the end result -- the troupe of adorable animals here -- is simple; the real challenge lies in perfecting just the right lion, dog, and pig voices.
Lion Puppet How-To1. Cut the mane from construction paper.
2. Slip bag's bottom into mane's opening to create face. Cut ears and arms from another bag; inner ears, eyes, nose, teeth, and claws from construction paper.
3. Attach arms to front half of side pleats, ears and teeth under face
Tip: Glue tiny details, such as claws, onto larger pieces before you assemble your new puppet.
Dog Puppet How-To1. Fold under lower corners of bag's flattened bottom and glue.
2. Cut blaze and belly from white construction paper, ears and tail from brown, eyes and nose from black, and tongue from pink.
3. Glue everything in place, securing tongue under face and tail to the back of bag.
Pig Puppet How-To1. Glue pink construction paper to bottom of a pink bag to hide creases.
2. Cut ears and snout from decorative paper in a rosy shade; glue in place. Add tiny construction-paper eyes and nostrils.
3. Cut arms from pink construction paper; glue to front half of the bag's side pleats.
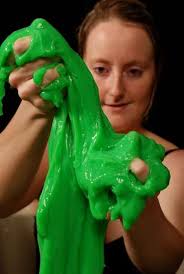
Daily Expirments: Silly Slime
* 1/4 cup of water
* 1/4 cup of white craft glue (like Elmer's glue)
* 1/4 cup of liquid starch (used for clothes)
* Food coloring (optional)
* Mixing bowl
* Mixing spoon
* 1/4 cup of white craft glue (like Elmer's glue)
* 1/4 cup of liquid starch (used for clothes)
* Food coloring (optional)
* Mixing bowl
* Mixing spoon
- Pour all of the the glue into the mixing bowl.
- Pour all of the water to the mixing bowl with the glue.
- Stir the glue and water together.
- Add your food color now - about 6 drops should do it.
- Now add the liquid starch and stir it in.
- It should be nice and blobby by now. As you play with your slimy concoction, it will become more stretchy and easier to hold.
- Explore your slimy creation and store it in a zip bag when you are not using it.

Subscribe to:
Posts (Atom)